Chia Seed Pudding

IMG_7044Chia seed pudding in something simple to make.  At first I was a little hesisitant to try it after seeing what it looked like but after a bite I got used to it & really enjoyed it.

I bought the Chia Shot package from The Chia Company at Whole foods. This comes with some white chia seeds & some black seeds.  They taste the same & to my knowledge aren’t really different.

I made these overnight but after a few hours the pudding would be ready to eat.  The chia seeds expand in liquid & become gelatonious.  HOW TO MAKE THIS: 1 & 1/4 cup of almond milk (you can use any type of milk sweetned or unsweetened) in a bowl with 1/4 cup chia seeds & 1/4 tsp vanilla.  Mix & refridgerate.  How much milk you use can change how thick or not the pudding in but you must use atleast a cup or the chia seeds wont be able to expand.  I topped the pudding with some strawberries, blueberries, coconut shreds, & on one of them cinnamon.

The pictures I have show one pudding with white chia seeds & one white black chia seeds.IMG_7059 IMG_7051 chia seed pudding IMG_7007

Acai Bowls

acai bowlAcai bowls are a healthy breakfast choice that can be easily made.  You can make the bowl your own but adding whatever toppings you would like.  To make these bowls I bought Sambazon brand unsweetened smoothie packs at Whole Foods.  Not every store sells these but you can go on their website and check to see where you can buy them near you.  Sorry I don’t have exact measurements I just cut some fruit & thew it in.  You can always add more fruit to the blender if you would like.  You can’t really make the bowl wrong.

To make an acai bowl: On the back on the packets it gives you general directions.  Run the packet under water for about 5 seconds cut the top off and empty the chunks into the blender. You can add whatever fruit you would like.  I added bannana’s & strawberries to the base.  You can also add milk or juice to sweeten it.  I added a LITTLE bit of almond milk.  If you want it to be thick don’t add too much.  After blending it I added my toppings.  I used some granola, shredded coconut, blueberries, kiwi, & some more strawberries.  I drizzled a little honey on the top as well.

Lots of people like to use goji berries, add some chia seeds or flax seeds, peanut butter, really you can add almost anything.  Have fun with it!!acai bowl

Smore’s Brownies

IMG_3851Ok so a lot of things I make are completely from scatch but that doesn’t mean I don’t cheat sometimes. Now I like brownies but there not my favorite thing, BUT these were pretty amazing not going to lie. The nice thing about these are that if you are going to bake for holiday party, you kids birthday or so on, even though they aren’t completely homemade 1. no one has to know & 2. atleast you added a little special twist to the normal brownie to make them even better and 3. way better then just buying something already made at the store or just bringing brownies that are clearly straight from the box mix. A little effort can go a long way.

What do you need?

DARK chocolate brownie mix (dark chocolate comes out wayyyy better then any other kind) Semisweet chocolate morsels Mini Marshmallows, graham crackers, butter & sugar

How do you make these?

First make the graham cracker crust.  It’s really simple. Crush up 1-1/2 cups (24 squares) of graham crackers. If you put it in a zip lock you  can easily crush them.  Melt 1/3 cup butter, then in a small bowl mix the graham crackers, melted butter and 1/4 cup sugar. After spraying the brownie pan press the graham cracker crust into the pan with not too much pressure.  You can decide however thick you would like your crust to be.  I then put the pan in the over that should be preheated to 325-350 (whatever the brownie box says) for 2-3.

Make the brownies how you would make any other brownies.  I personally like my brownies to be kinda gooey so I normally put the brownies in about 7-10 minutes less check on them with a toothpick & decide how much longer they really need. I take them out when there still gooey but the edges are more cooked.  Pour the brownie mix over the graham cracker & cook.

Once you take them out throw on the chocolate chip morsels all over the top.  They will probably start melting right away because of the heat.  Then I topped them with mini marshmallows & threw the pan back in the oven on broil until they were brown.  BE CAREFUL & WATCH them because they can burn very easily. You can use big marshmallows if you would like.  I hope you enjoy these as much as I did.IMG_3832

Homemade Halloween costumes

IMG_2525Halloween coustumes can cost a lot of money AND you can show up in the same exact one as someone else. Who wants that.  But you can make your own for less & it be original.  So with halloween coming around the corner before you know it I decided to do a post on it.

Now lots of people put together costumes.  A lot of times people wear black & become a cat, punk rocker, police & so on but you can make your own costume & spice it up.  What I normally do is I goto the mall & walk in to Forver 21 & see what they have & what costumes I can make from it.  Not everyone can so easily think on their feet but hopefully after I show you some of my costumes & how easily you can make something out of nothing it will inspire you.IMG_1841

2 years ago my friend & I decided to do toddlers & tiaras.  Yes this was a semi popular costume but yes ours were the best! How to make it: I simply took 2 white hanes & dyed them pink with some Rit dye you can buy at most crafts stores. I happened those big feathers in my house so I glued them on & I glued some rhinestones I bought on as well as some flowers.  I bought the flowers from Michaels’ & cut them off the stem.  To make a sash I simply bought some thick ribbon & painted on Little Miss with some black paint I had.  I already owned the tutu & bike shorts to wear under.  I then bought a crown at Claire’s & tada all done & a original costume. Make up & hair really make a difference in coustumes too.    (*if you don’t have a certain piece of clothing you need ask your friends i’m sure they are willing to share which is a money saver)

This same year on a different night we were decided to dress up as women that goto the derby. To make this: I forgot the store name we bought the dress from, ( I was visiting her in Arizona where she goes to school) but it was a dress we found on sale & was very cheap.  Then all we needed was accessories which were not to expensive at all.  We got a “pearl” necklace, white gloves, & a hat. Simply, cheap, original, & a great costume.  We got soo many compliments on it, we were surprised.IMG_2365This last year I had the idea of going as an alien at first when I saw all the metallic silver clothing in Forever 21.  That idea then somehow turned into going as Zenon Girl of the 21st Century from the disney channel.  I never even looked up what she looked like but I just went with it from memory & it turned out pretty well I think.  To make this: I got a blue valor dress & a metallic silver skirt from Forever 21.  Then I found VERY old butterfly clips in my house that I put in my hair after curling it.  I also found some old earrings, an old bracelet that I thought went with the theme & a VERY old hot loop to wear as a necklace.  I put some makeup on with glitter & done.  IMG_3523 IMG_3530I was not actually the next costume below but this is to show how easily a costume can be made from nothing.  While I was at my friends house getting dress I had put my dress on & then wanted to play a little dress up. While playing dress I had decided I had come up with a new costume, a video gurrrrrl. To make this: I just added accessories to my dress. I put on a studded hat , some sunglasses, & a chunky necklace.  How easy is it?

So when halloween comes around & you want to have a great original costume & not spend a ton REMEMBER its easy, you just have to be a little creative & think a little. GOODLUCK & I hope you have a happy halloween!IMG_3513 IMG_3516

American Globs

all things yummyMy Big Gay Ice Cream Shop is an ice cream place in New York City.  I had seen pictures of there ice cream & couldn’t wait for the day I got to try it.  Now I am in LOVE with dessert.  I have a list (in my head) of all the places I MUST try & slowly I knock them off.  This was defintely on the list & I am happy I got a chance to have it because it was amazing.  It stinks when I am so excited to try something & it is a let down but this was defintely not that.  I always try to go back but it hasn’t happened yet but I know one day soon I will be visiting it again.

They have a menu of a handful of different prepame cones they have.  I choose the American Glob & it was a good choice. This ice cream cone consists of vanilla ice cream, pretzels, sea salt & a chocolate dip.  When I saw her sprinkling the sea salt I was getting nervous at first that I would not like it.  It turned out to be the perfect sweet & salty.  Normally I wouldn’t want a mix but if its going to be this perfect then I am all in.

The first picture shows what it looks like freshly dipped and yes you use a spoon to eat it. I then took another once the chocolate hardened. Just looking at these pictures again is making my mouth water.all things yummy

Homemade IcePops

all things yummyI know this post is a little late but I eat ice pops all year long & if you don’t well now you’ll be ready to make these next spring. They were so simple to make it was crazy.  My friend & I went to Stop & Shop to buy the ice pop holders & that was the hardest part haha.

IMG_7789Ingredients: 2 cups & tbsp water_ 5 tbsp granulated sugar_12 oz mango peeled,_12 oz fresh strawberries_10 oz kiwis_crystal light packet (if you don’t know oz just use your head & think about how much you think you can get out of each)

To make these simply boil the water & sugar to make a simple syrup. If you think you will want your ice pops to be sweeter add more sugar. Once the sugar is dissolved take take it off the heat & let sit. With the fruit you have decided you would like to use, we used raspberries, mango & kiwi peel & then puree them each separately in a blender or if you have a magic bullet. Then divide the simple syrup equally into each bowl of the puree fruits you have & mix. If you have time you should add one flavor into the mold & freeze for about 45 minutes to an hour. Add the next flavor freeze for 20 minutes & then the final flavor & freeze til completely frozen & ready to be eatten. If you don’t feel like waiting that long (trust me I know I get impatient a lot) then add the thickest puree first then the next thickest pureed flavor & then add the final flavor & freeze.  If they are all the same thickness they might run into each other & not look as pretty but they will taste as yummy.

We also made another type of ice pops where we used crystal light packets.  We used lemonade flavored ones and strawberry caffeine ones.  We made them as you normally would but with less water to make them stronger.  Then we simply put them into the mold threw & threw a few blueberries in. In a few we used some raspberry puree at the bottom & then put the strawberry packet water on top.IMG_7830 all things yummy

Madison Square Eats

all things yummyMadison Square Eats is an event that happens for a few months and is a bunch of different food vendors all in one area. It is so GREAT. What isn’t so great is that it has to many different food options & its so hard deciding what I want to eat.   IMG_7298The first time I visited this summer I went with my dad.  We got lobster rolls from Red Hook Lobster. Unfortunately it started to rain so we got them to go & ate them at his apartment.  They were still just as amazing though.  There are a few different choices of lobster rolls you can have.  I got the Tuscan Style Lobster roll which is tossed in a basil vinaigrette & my dad got the Maine style which is the “normal” one tossed in their homemade mayo.  They put so much lobster its great!

IMG_7455 IMG_7404The next time I went to Madison Square Eats I was meeting a friend for lunch.  She got 2 summer rolls form Two Tablespoon which was perfect for her because she’s very healthy & a vegetarian.  She got coconut water in a coconut to go with it from Pig & Khao.  I got the bento box from Takumi Taco which is 2 tacos & a sides.  I got the spicy tuna & spicy yellowtail taco with a charred corn salad.  We both loved our lunches.IMG_7417 IMG_7425 IMG_7439

The next time I went I was with some friends & we wanted a quick snack so it was perfect.  My friend & I shared the spicy peanut noodle bowl from Hong Kong Street Cart. We both really enjoyed it although she needed a water bottle handy because she’s not too much about spice.IMG_8947 IMG_9413 all things yummy

The last & final time I was with my dad.  I was starvvving & he had just had a bite to eat so he watched me eat, welll lets be real of course its to hard for him just to watch so I let him pick & have the side that came with my food.  I went back to Takumi Taco again but this time I tried 2 different tacos. I got the Miso Chicken Taco & the Short Rib Taco.  They were both amazing but wow did I LOVE the short rib taco.  My dad choose the beans & rice as the side.  Then for a little dessert I got the Momofuku Milk Bar milk & cornflake pudding pop. I had to try it because they don’t sell it in their stores its a speciality.IMG_9423

Vegetable Spring Rolls

all things yummy spring rollsSpring rolls are fun to make and surprisingly easy.  I mean I wouldn’t say I’m a pro spring ROLLER just yet but I have to give myself a little pat on the back for how they turned out.

What’s good about spring rolls is you can really put whatever you want in them its up to you.  Below are the ingredients that I decided to use but you can use your imagination and the things you love to create your spring rolls.

all things yummy spring rollsMY INGREDIENTS:

– Any spring roll wrappers you can find (My were from Shop Rite near the tacos & asian food section) – Saifun Noodles – Canned chopped water chestnuts – Pre made Bagged Broccoli Slaw – Scallion – Cucumbers – Butter Lettuce – Peanut Dressing

First I softened the noodles by following the package & placing them in boiling water for 15 minutes.  While the noodles were in the water I chopped the  scallion and cucumbers in to long,thin chopped up pieces.  I then got all the ingredients ready for rolling. The directions to make spring rolls are found on the back of the packaging.  They are simple, wet the spring roll wrappers for 15-20 seconds in warm water and once you feel it becoming gelatinous take it out and place it on a cloth.  Now you will place the ingredients in the spring roll. Below is a picture I found to help illustrate where to put the ingredients.  Put as much or as little as each ingredient as you would like and then roll it up.  I used a peanut dressing as my dipping sauce which I found at Stop & Shop, it was perfect because it was a little bit spicy. I hope you enjoy your spring roll and put your on take on it with ingredients you love.

images

all things yummy spring rolls

PUMPKIN PANCAKES & Coconut Milk Whipped Cream

all things yummy pumpkin pancakesI know I sound like many girls when I say this but I LOVE PUMPKIN. When fall comes around I get in such a good mood between the perfect weather and pumpkin flavored food. So with fall coming upon us I decided to make some pumpkin pancakes and boy were they good.

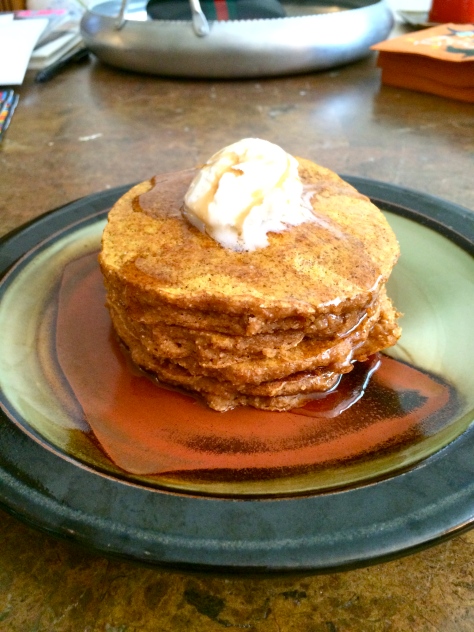
UnfortunatelyI realized I did not have canned coconut milk so what you see above is cool whip but the recipe will be below for it as well.

To make the pancakes you will need:

– 1/2 cup canned pumpkin (I use Libby’s)
– 1/4 cup coconut milk ( can be unsweetened if you preferred)
– 2 egg whites
– 1/2 tsp. vanilla extract
– 1/2 cup white whole-wheat flour
– 1/2 tsp. baking soda
– *1/4 tsp. pumpkin spice
– 1/2 tsp splenda/stevia/sugar ( I used half stevia half splenda)                     – a dash of salt
*(Didnt measure this exact but put about 6 taps of the cinnamon bottle, 2 taps of ground ginger, 2 taps of nutmeg a tap of allspice and a tap of cloves- really is to your likings)

To make these mix the pumpkin, egg whites, vanilla extract and coconut milk in a bowl. In a separate bowl mix the flour, baking soda, sugar, salt & pumpkin spice. Then put the dry ingredients into the wet  ingredients and mix until everything is completely mixed in.  Spray a non stick skillet, put on medium heat and once you put the batter on wait until you see bubbles and flip the pancakes.                                         Once there done top with whatever you would like and ENJOY.

 IMG_9491

For the coconut milk whipped cream you will need:

-*1 Can of Coconut Milk full fat

– 1/2 tsp vanilla (optional)

– Sweeteners (optional) * (I used 15 oz of coconut milk but use how much you want to make)

To Make this you should have refrigerated the milk overnight. Once you take it out flip the can over. The liquid coconut milk that doesn’t harden will now be at the top.  Then open the can from the bottom. (If you don’t flip the can before opening you will spoon out the hardened coconut and just be careful to not get the liquid.) Pour out the liquid into a different bowl if you would like to save it for other use other wise pour into the garbage. Then scoop out the hardened cream grab a hand mixer and whip til you see small peaks. Now is when you can add the vanilla or other sweeteners like confectioners sugar if you would like.